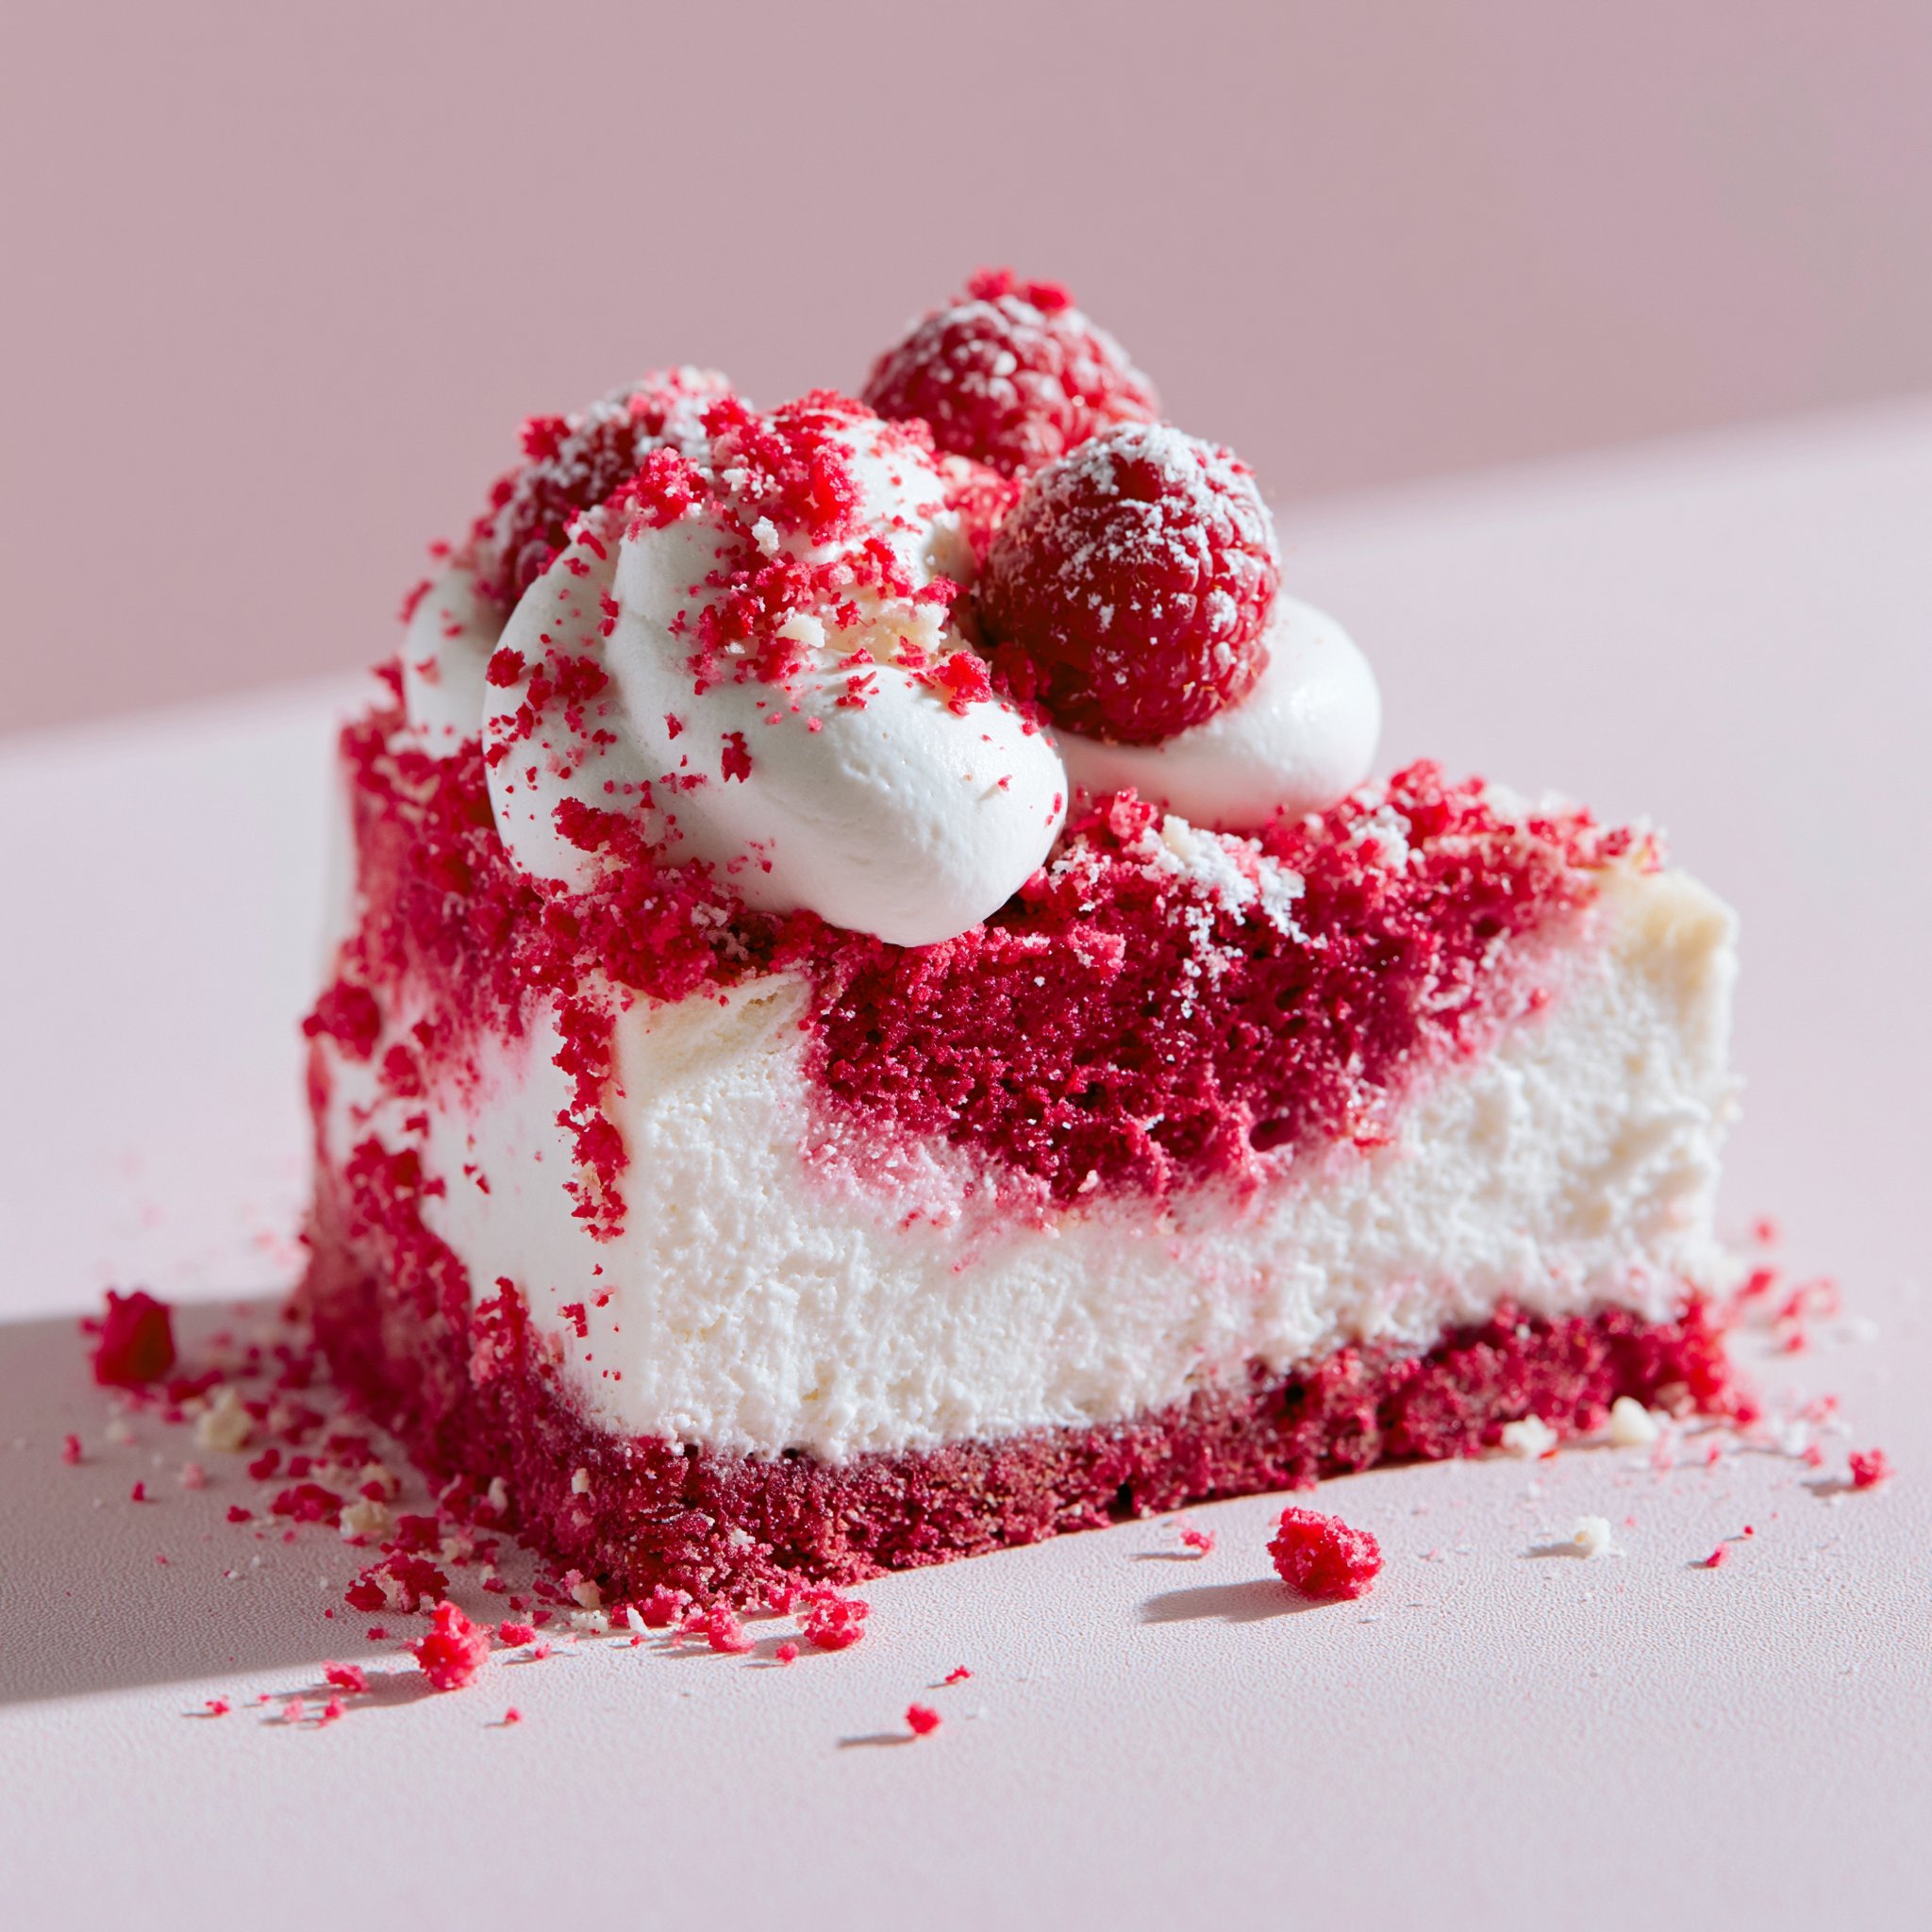
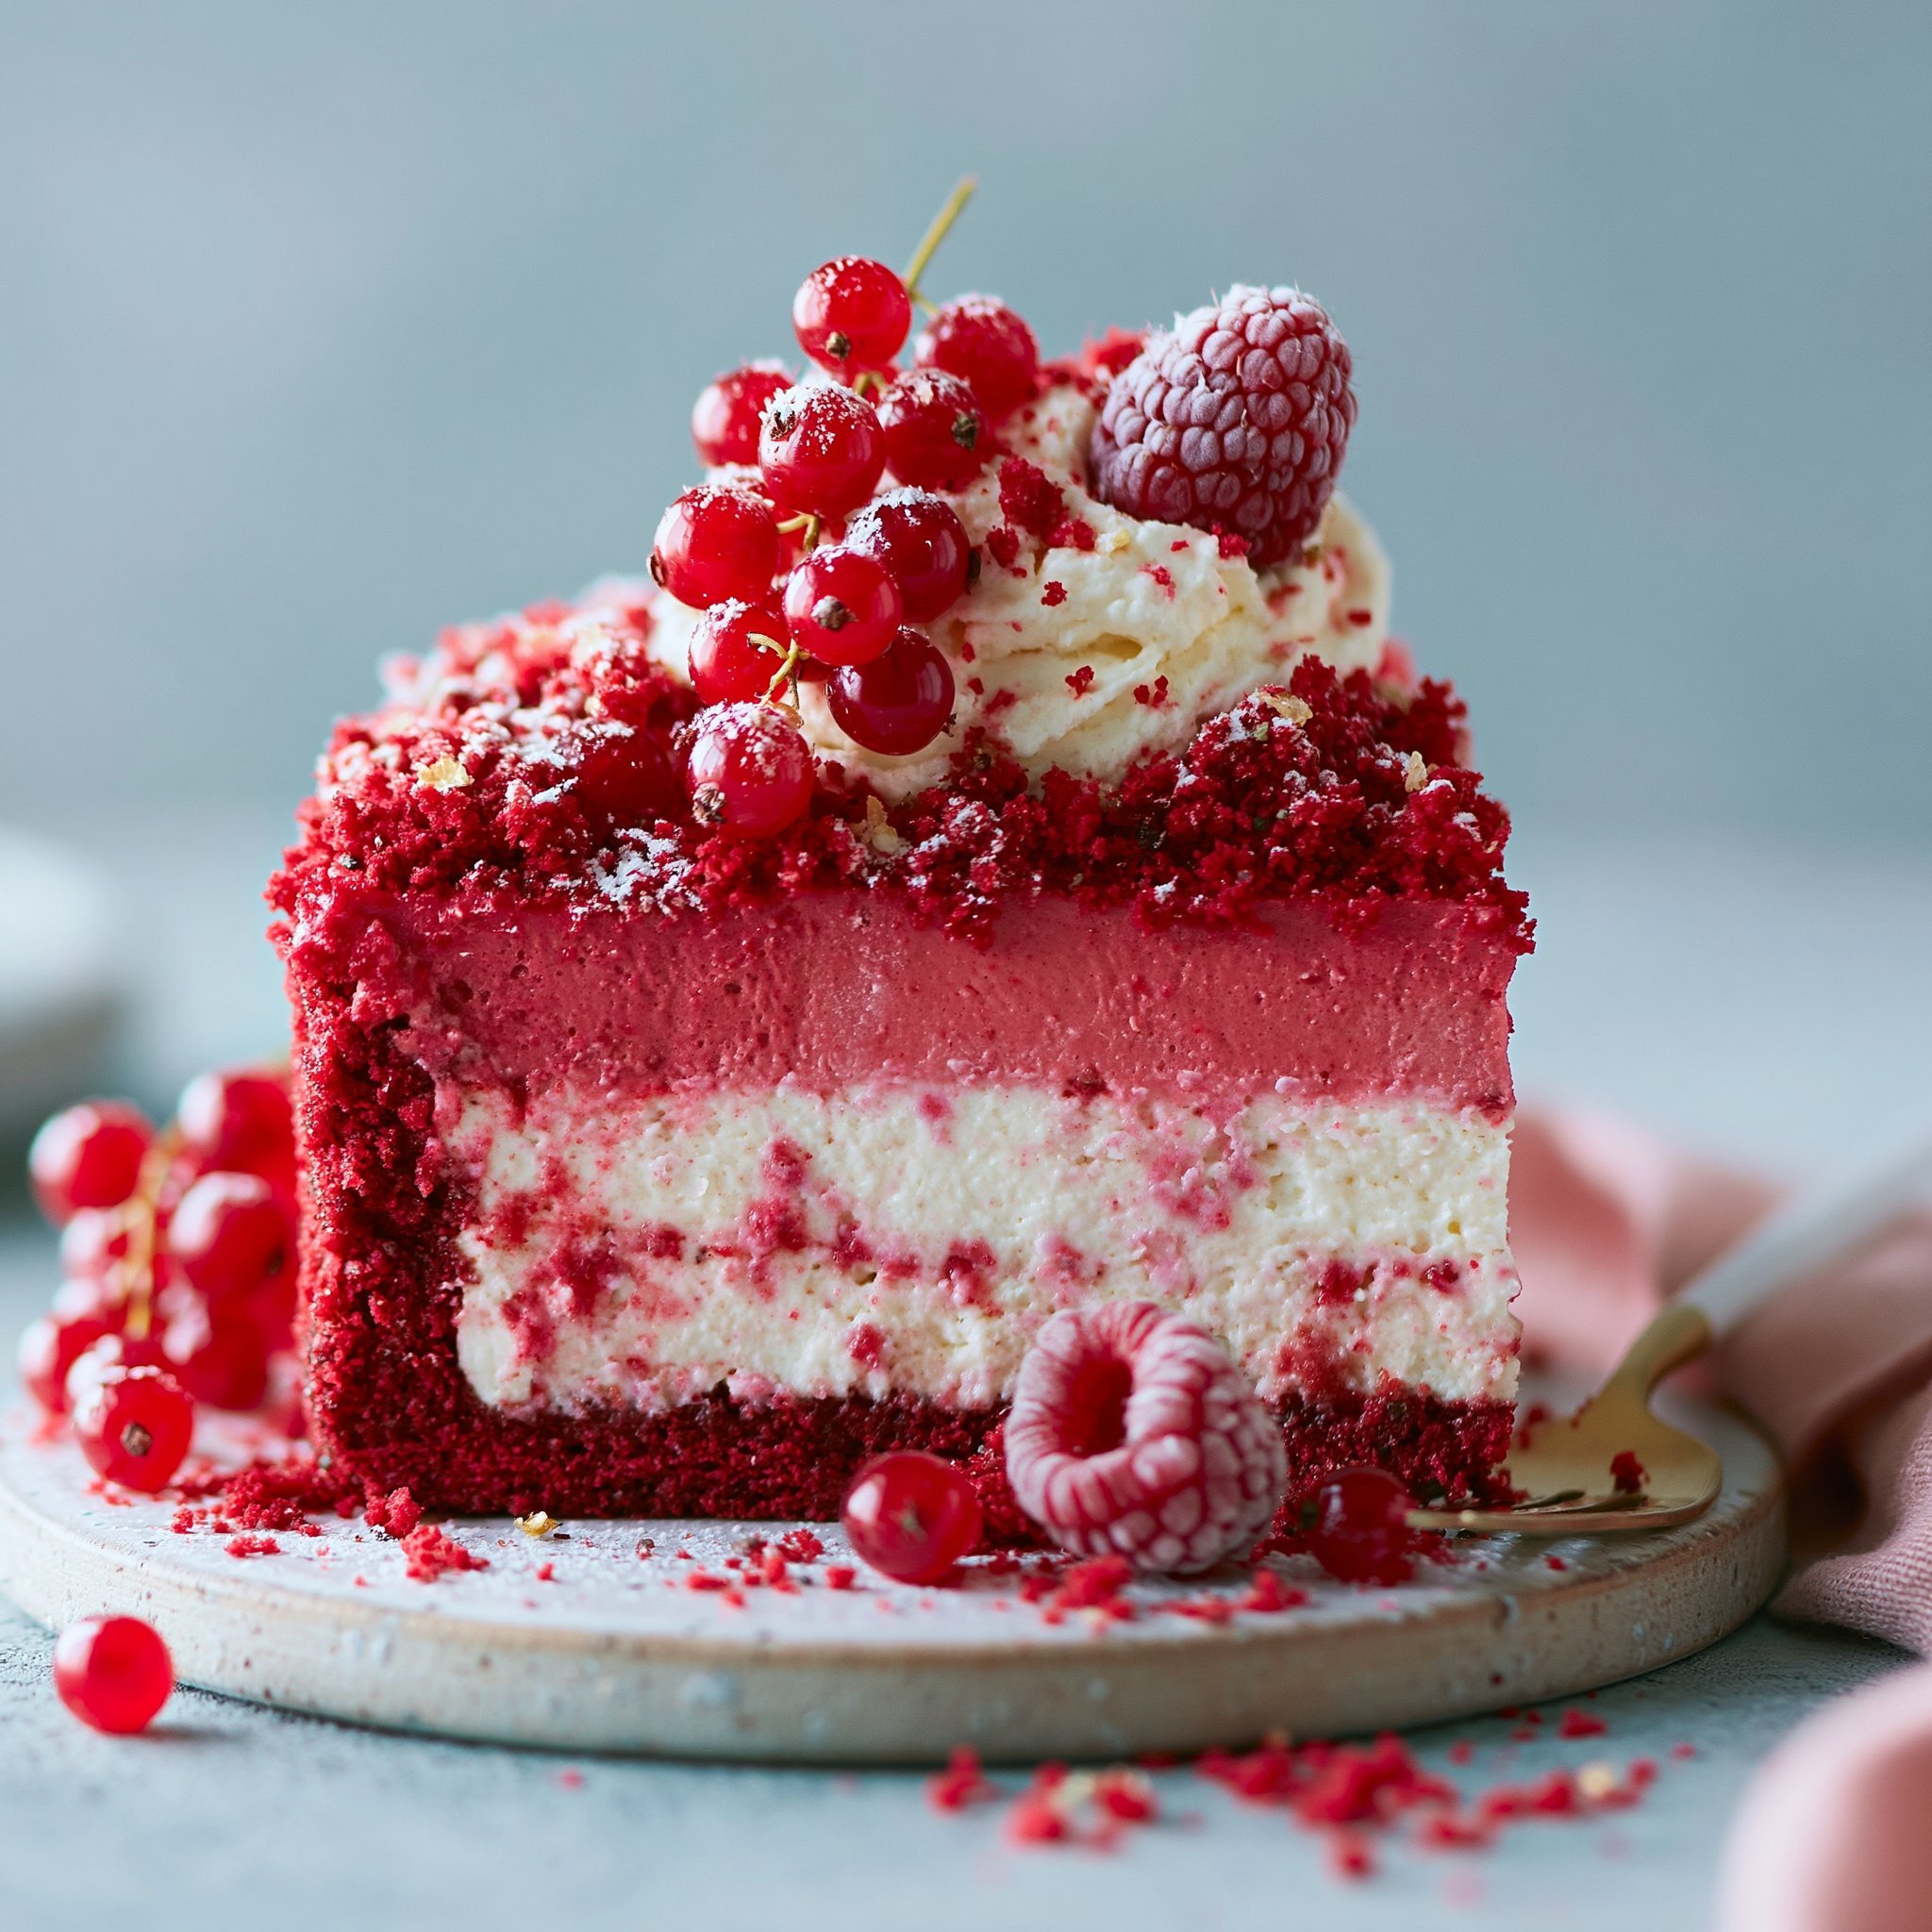
A red velvet cake base plus a thick, vanilla-scented cheesecake layer is the kind of dessert that looks like you planned for days—when really, the “shortcut” is starting with a box mix and building from there. You get that plush cocoa-red crumb on the bottom, then a creamy, lightly tangy cheesecake that slices clean once it’s properly chilled.
If you like baking projects with a big payoff but minimal fuss, this is it. And if you want more cozy desserts like this one, I keep a running stash over on my recipe collection that’s heavy on chocolate, bars, and crowd-friendly sweets.
Why You’ll Love This Recipe
- The two-layer build (cake + cheesecake) gives you a gorgeous slice with clear stripes and a sturdy base that doesn’t crumble apart.
- The cheesecake layer is rich but balanced: sour cream adds a gentle tang that keeps the sweetness in check.
- A whipped cream topping (sweetened with powdered sugar and vanilla) makes it feel finished without needing a complicated frosting.
- Using a springform pan means easy release and neat edges—especially helpful with a tall, layered cheesecake.
- It’s a true make-ahead dessert: the chill time improves the texture and makes slicing much cleaner.
- Optional red velvet crumbs on top add contrast and a bakery-style look with almost no extra work.
The Story Behind This Recipe
I put this together when I wanted a red velvet dessert that felt a little extra, but I didn’t want to juggle multiple cake layers and frosting—so I leaned on cake mix for a dependable base and let the cheesecake do the “wow” work, finishing it with a simple vanilla whipped topping (and a few red crumbs when I’m feeling fancy).
What It Tastes Like
The first thing you notice is that classic red velvet aroma—light cocoa and vanilla—followed by the creamy cheesecake layer that’s dense, smooth, and slightly tangy from the sour cream. The whipped topping stays airy and soft, so you get a nice texture contrast: fluffy cream on top, silky cheesecake in the middle, and tender cake underneath.
Ingredients You’ll Need
This recipe is all about smart layering. The red velvet cake mix creates a sturdy, tender base; the cream cheese + sugar + eggs make a thick cheesecake that bakes up glossy and smooth; and just a spoonful of flour helps the filling hold together for clean slices. For the topping, cold heavy cream whips into soft peaks—keep it chilled so it stays light and cloudlike. If you’re a red velvet purist, save a bit of cake for crumbs; it makes the top look extra polished.
- 1 box red velvet cake mix (plus eggs, oil, and water as directed)
- 16 oz cream cheese, softened
- ⅔ cup granulated sugar
- 2 large eggs
- ⅓ cup sour cream
- 1 tbsp all-purpose flour
- 1 tsp vanilla extract
- ¼ tsp salt
- 2 cups heavy whipping cream
- 4 tbsp powdered sugar
- 2 tsp vanilla extract
- Optional: red velvet cake crumbs for garnish
How to Make Knock You Naked Red Velvet Cheesecake
- Bake the red velvet base. Heat your oven to 350°F (175°C) and grease a 9-inch springform pan. Mix the red velvet cake batter according to the box directions, then pour it into the pan. Bake for 30–32 minutes, until the top springs back lightly and a toothpick comes out clean. Cool the cake completely (warm cake will melt the cheesecake layer and throw off the bake).
- Chill the cake and prep for cheesecake. Once cool, refrigerate the cake layer while you make the filling. Reduce oven temperature to 325°F (163°C).
- Mix the cheesecake filling (don’t overdo it). Beat the softened cream cheese and granulated sugar until smooth and creamy with no visible lumps. Add the eggs one at a time, mixing just until each disappears into the batter. Then mix in the sour cream, flour, vanilla, and salt until the filling looks thick, glossy, and cohesive. (Stop mixing as soon as it’s smooth—overmixing can add air and lead to cracking.)
- Layer and bake. Line the inside sides of the springform pan with parchment. Pour the cheesecake filling over the chilled cake base and smooth the top. Bake for 55–60 minutes, until the edges look set and the center has a gentle jiggle (it shouldn’t look wet or sloshy).
- Cool, then chill thoroughly. Let the cheesecake cool at room temperature, then refrigerate for at least 4 hours so it fully sets. If you want extra-firm, ultra-clean slices, freeze for 1 hour right before topping and slicing.
- Whip the topping and finish. In a cold bowl, beat the heavy whipping cream with powdered sugar and vanilla until soft peaks form (pillowy, not stiff and grainy). Spread or pipe over the chilled cheesecake. Garnish with red velvet crumbs if you’d like, then slice and serve cold.
Tips for Best Results
- Truly soften the cream cheese. If it’s still cool in the center, you’ll chase lumps forever and end up overmixing.
- Mix eggs gently and briefly. Once the eggs go in, you’re aiming for “just combined” to keep the texture dense and creamy rather than puffed.
- Use the jiggle test. At the end of baking, the edges should look set while the center wobbles like set custard; it will firm up as it chills.
- Chill before topping. Putting whipped cream on a warm cheesecake guarantees sliding and melting—wait until it’s fully cold.
- For sharp slices, think cold + clean knife. Slice straight from the fridge (or after that 1-hour freeze), and wipe the knife between cuts.
If you’re on a chocolate kick after this, you might also like the fudgy vibe of air fryer brownies—they’re a totally different method but scratch the same “rich dessert” itch.
Variations and Substitutions
- Skip the garnish, keep the drama. The whipped topping alone looks beautiful; the red velvet crumbs are optional, not required.
- More vanilla presence: If you love a bold vanilla aroma, don’t skimp on the vanilla in the cheesecake or the whipped topping (it’s doing a lot of flavor work here).
- Slightly tangier finish: Use the sour cream as written—this is not the place to reduce it, because it balances the sweetness and helps the texture.
For a different kind of chocolatey snacky-sweet, I also keep chocolate coconut bites on rotation when I want something quick from the fridge.
How to Serve It
Serve this well-chilled for the cleanest layers and best texture—think dense, creamy cheesecake against that tender red velvet base. I like slicing it straight from the fridge, then letting each slice sit for 5 minutes so the flavors open up a bit. If you saved cake crumbs, sprinkle them over the whipped topping right before serving so they stay vibrant and don’t bleed.
If you’re building a dessert table, pair it with something handheld like chocolate brownie cookies so guests can grab a second sweet without needing another plate and fork.
How to Store It
Store the cheesecake covered in the refrigerator. It holds its best texture for several days, and the flavor actually improves after the first full chill. If you want to make it ahead, bake and chill the cheesecake first, then add the whipped topping closer to serving for the prettiest finish. For longer storage, you can freeze the chilled cheesecake (topping added or not), then thaw in the refrigerator until sliceable; a brief 1-hour freeze is also a handy trick for extra-clean cuts.
If you’re planning make-ahead snacks for the week alongside dessert, no-bake granola bars are a great low-effort counterbalance to a baking day.
Final Thoughts
This knock-you-naked-style red velvet cheesecake is the kind of recipe that delivers on contrast: plush red velvet crumb, glossy cheesecake, and a soft whipped finish that makes every slice look bakery-neat. Give it the full chill time, slice it cold, and you’ll get that clean, dramatic layer effect that makes people pause before the first bite.
Conclusion
If you want to compare other takes on this dessert style, check out Knock You Naked Red Velvet Cheesecake! for another layered approach, Red Velvet Cheesecake for a classic variation, and Knock You Naked Brownies for the original “knock-you-naked” inspiration in bar form.