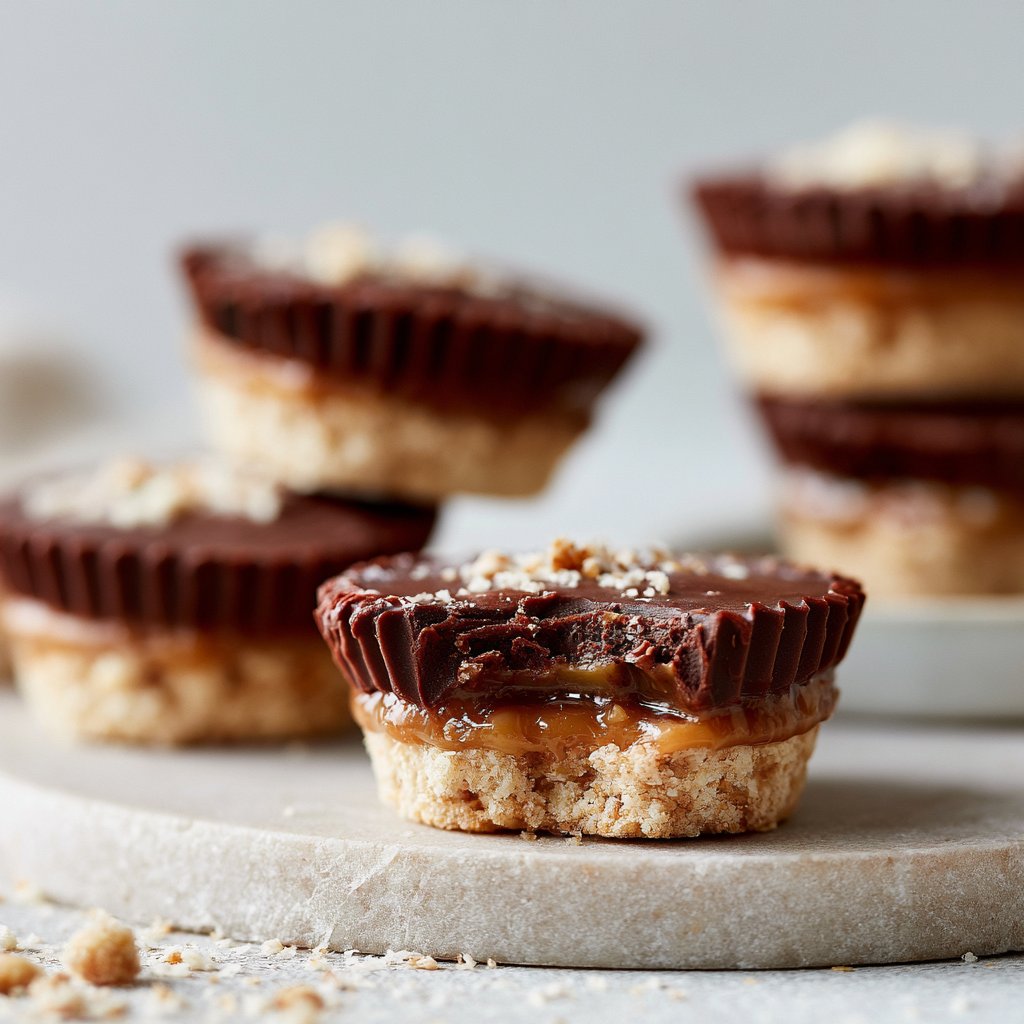
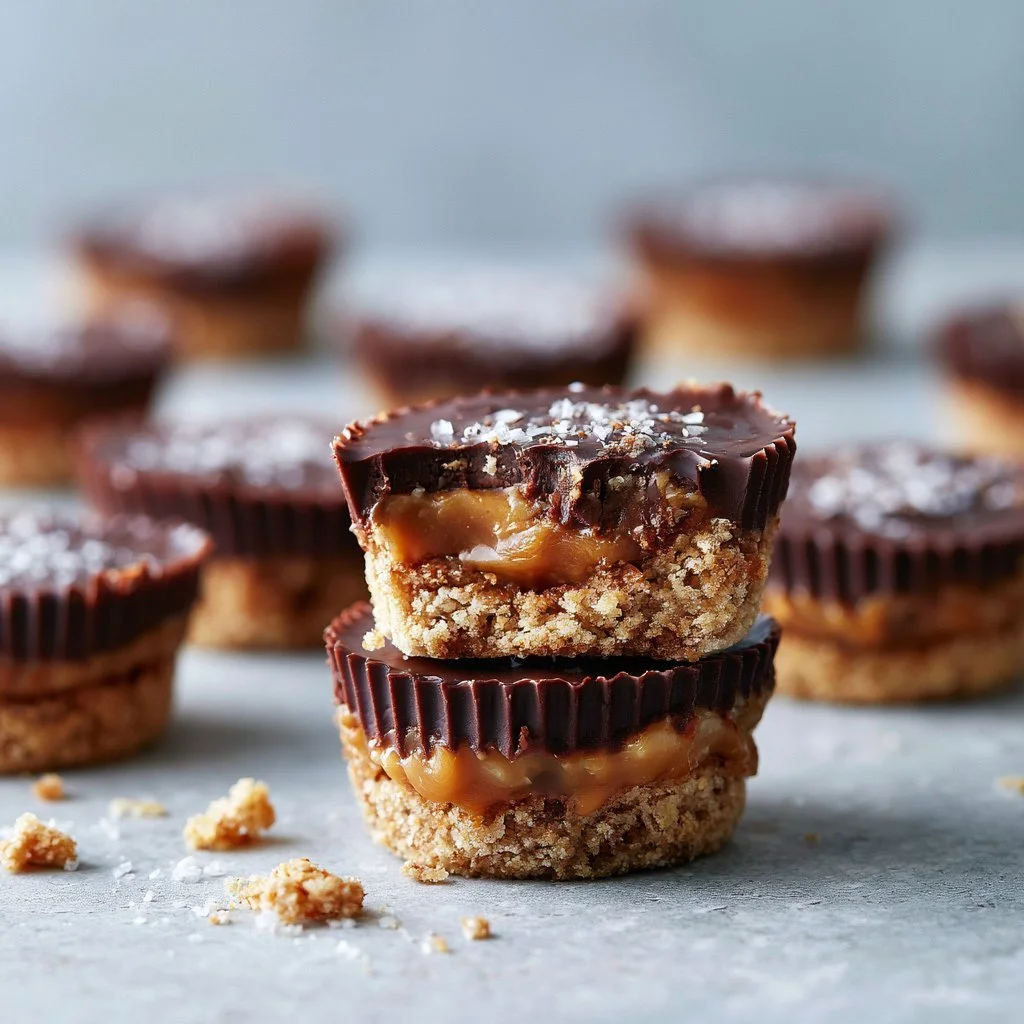
There’s something magical about making your own treats at home, and these Healthy Twix Cups bring indulgence without the guilt. Imagine a chewy layer of caramel made from pitted dates nestled between a buttery cookie base and a rich, glossy chocolate topping. They’re not just delicious; they feel incredibly satisfying to bite into. Plus, they come together with simplicity and ease that makes you want to whip them up again and again. You may also find Healthy Chocolate Coconut Bites useful.
This recipe stands out because it perfectly balances flavors — the nutty depth of almond flour, the natural sweetness of maple syrup, and the luxurious richness of dark chocolate. With just a few steps, you can create a treat that’s both comforting and refreshing, ideal for satisfying sweet cravings while keeping your health goals in mind. If you’re a fan of wholesome snacks and desserts, you’ll definitely want to try making these Healthy Twix Cups.
Why You’ll Love This Recipe
- The layered texture offers a delightful crunch from the cookie base and a smooth, creamy caramel.
- They’re completely vegan and made without refined sugars, making them a guilt-free treat.
- Take advantage of make-ahead convenience; they keep well in the fridge or freezer.
- The combination of dark chocolate and almond butter provides a rich flavor that’s hard to resist.
- They’re perfect for sharing, but you might want to keep them for yourself!
The Story Behind This Recipe
These Healthy Twix Cups were inspired by a desire for indulgent treats that also honor a healthy lifestyle. The use of natural sweeteners and wholesome ingredients ensures that you can enjoy a sweet snack without compromising on your dietary choices.
What It Tastes Like
With each bite, you’ll experience a symphony of flavors: the caramel’s sweetness perfectly harmonizes with the nutty undertones of almond flour, and the dark chocolate brings a rich, satisfying finish. The cups are rich yet light on the palate, with a lovely creamy texture that melts in your mouth. The hint of sea salt on top rounds out the sweetness, making each piece crave-worthy.
Ingredients You’ll Need
The key ingredients in these Healthy Twix Cups play significant roles in achieving the desired flavor and texture. Almond flour provides a nutty flavor and a delicate crumb, while coconut oil adds moisture and richness. Dates serve as the base for the caramel, bringing natural sweetness and a chewy texture, while dark chocolate represents the final decadent layer.
- 1 cup almond flour
- 1/4 cup coconut oil
- 1/4 cup maple syrup
- 1/2 cup pitted dates
- 1/4 cup nut butter (e.g., almond or peanut)
- 1/4 cup coconut milk
- 1 cup dark chocolate chips
- Sea salt (optional, for topping)
How to Make Healthy Twix Cups
- In a mixing bowl, combine the almond flour, melted coconut oil, and maple syrup. Stir until well blended into a sticky cookie base that holds together when pressed.
- Firmly press the cookie mixture into the bottom of muffin cups or a silicone mold, creating an even base.
- For the caramel layer, blend the pitted dates, nut butter, and coconut milk until the mixture is smooth and creamy, ensuring there are no chunks.
- In a microwave-safe bowl, melt the dark chocolate chips in 30-second increments, stirring between each session until completely smooth and glossy.
- Pour the melted chocolate over the caramel layer, making sure to coat it thoroughly and evenly.
- Refrigerate the cups for 1-2 hours, or until the chocolate is firm to the touch without any jiggle.
- Carefully remove the cups from the molds and sprinkle a hint of sea salt on top, if desired. Your Healthy Twix Cups are ready to enjoy!
Tips for Best Results
- Allow the coconut oil to cool slightly after melting; this prevents the chocolate from seizing.
- Ensure the dates are soft and fresh for a creamier caramel texture; if they’re hard, soak them in warm water for 10-15 minutes.
- Press the cookie base firmly to create a sturdy foundation that won’t crumble when you take a bite.
- Keep an eye on the chocolate while melting to avoid burning; stirring frequently helps maintain a smooth consistency.
- Let the cups sit in the fridge for the entire recommended time to achieve optimal firmness.
Variations and Substitutions
You can switch out almond flour for another nut flour, like hazelnut or sunflower seed flour, for different flavor profiles. If you’re after a nut-free version, opt for sunflower seed butter instead of almond butter. Feel free to experiment with different nut types in the chocolate layer, such as using a blend of dark and milk chocolate.
How to Serve It
Serve these Healthy Twix Cups as a delightful treat after meals or during snack time. Pair them with a warm cup of tea or coffee for an afternoon pick-me-up, or enjoy them chilled straight from the fridge. For added flair, consider drizzling extra melted chocolate on top or serving them alongside fresh fruit.
How to Store It
For best results, store the Healthy Twix Cups in an airtight container in the fridge, where they will keep well for up to a week. You can also freeze them for longer storage; just layer parchment paper between each cup to prevent sticking. When you’re ready to enjoy, simply let them thaw in the fridge for a few hours.
Final Thoughts
I hope you find as much joy in making these Healthy Twix Cups as I did. They’re not only a delicious treat but also a testament to how satisfying healthier desserts can be. I encourage you to try this recipe and share it with friends; they’re bound to be a hit at any gathering!
Conclusion
For those looking for delightful yet health-conscious treats, consider checking out Healthy Twix Cups (Vegan) or explore the option of Healthy Vegan Twix Cups (paleo). If you’re after bite-sized versions, don’t miss Bite-Sized Twix Cups for an even more portable delight.
Healthy Twix Cups
Ingredients
Method
- In a mixing bowl, combine the almond flour, melted coconut oil, and maple syrup. Stir until well blended into a sticky cookie base.
- Firmly press the cookie mixture into the bottom of muffin cups or a silicone mold, creating an even base.
- For the caramel layer, blend the pitted dates, nut butter, and coconut milk until the mixture is smooth and creamy.
- In a microwave-safe bowl, melt the dark chocolate chips in 30-second increments, stirring between each session until completely smooth.
- Pour the melted chocolate over the caramel layer, coating it thoroughly and evenly.
- Refrigerate the cups for 1-2 hours, or until the chocolate is firm.
- Carefully remove the cups from the molds and sprinkle with a hint of sea salt, if desired.